For making high-quality dark spore prints for personal use and trade. A double printing technique is employed for spore prints for trade and prints that will be made into syringes. Even without this extra precaution, you’ll find the first of the two printings is suitable for agar use with a very low contamination rate when plated on agar.
What you will need:
- A SAB(still air box) or LFH(laminar flow hood)
- A roll of heavy-duty foil
- A spray bottle with sanitizer(70% iso)
- A scalpel with a fresh sharp blade
- Disposable powder-free gloves
Sporulating mushrooms, use second flush or third flush ones for larger prints.
Even though it only takes two spores and a small light print will do, the bigger and darker the spore print the more spores there are. This out-competes any extraneous contaminant spores that may be present. If there are 10 rogue spores on your print. Would you rather have 1,000,000 cube spores or 100 million? Each time you swab that print you’d have a 10 to 1 million ratio or a 10 to 100 million ratio of spores to contaminants.
To make spore prints for trades or to people who may not have access to agar or haven’t gotten there yet in proficiency. You will make two prints from one cap, and use the second one for those circumstances. The logic behind this is that the caps of the mushrooms grown and transported through open-air have accumulated some rogue mold spores. The first print is taken for 4-6 hours and any rogue contaminant spores should be dislodged on to the first print. This first print should contain more of the rogue contamination than the second print will. In practice, this first print still works very well. Save these first prints for yourself and agar work. The second spore print will take 12-24 hours to develop a nice dark print. This second spore print can be assumed to be even more contaminant free and is a good choice for riskier methods like making spore syringes in lieu of agar work.
How to do it:
Set up your SAB as you normally would. I wipe the table down with a Clorox or alcohol wipe and the inside surfaces of the SAB then put something heavy on the top so it cannot slide around. Since I’m not using a torch I lightly spray the inside of the SAB with the 70% iso this helps the foil stick to the floor better and has nothing to do with making the SAB environment cleaner. The SAB works by virtue of its design. Put some gloves on and spray your hands down with your 70% iso alcohol.
inside the SAB lay out a piece of foil this will be the new floor. then lay out a piece of foil on top of that. Foil comes sterile off the roll. the floor piece was removing the first roll of foil off the roll, the second sheet is our printing surface which has been protected from contamination by the outer roll of foil we used as the floor.
Cut the caps off your mushrooms and peel off any veil remnants that are in the way of the gills. I spray the scalpel with iso, I see no point in flaming the scalpel to cut the caps off mushrooms grown in the open air. The second printing technique takes care of any worrying contaminants.
Then place your caps onto the printing foil. Lay the caps only on the bottom half of the foil. You’ll be folding the foil in half to cover the print later. I can comfortably fit about 9-12 prints of large 3-5 inch caps in my 110q SAB at a time with room to eventually transfer them to new foils and let the first ones dry. Let these first ones print for 4-6 hours. Loosely tent the prints with another piece of foil. while you’re printing cover the holes of your SAB. Push this to the back of your sab. After 4-6 hours put the tent aside and remove the caps to a newly prepared printing foil in the front of the SAB. Once you remove the caps and put them on to new foil for the 2nd printing round you’ll notice your prints have some moisture on them. They will need to dry before you fold them up. I put the prints in the back of the SAB to dry, loosely tented with the same tent you used when they were printing. The second round of printing will take 12-24 hours to develop a dark print. You can take the dry first prints out and fold them up or make a new tent for the second round prints and then fold them all at once.
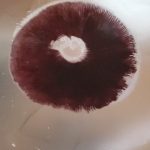
Your prints should look like this once dry:
To wrap your print in foil:
First, you’ll fold your foil in half to cover the spore prints. Then fold in between each print and you’ll be able to tear the individual prints away. I would avoid using scissors with anything having to do with making prints. Why cut through something with a sanitized interments when you can choose more sterile steps to take. Once the foils are all cut out you’ll have squares with the print on the inner surface protected by the sterile foil.
Fold them up like this:
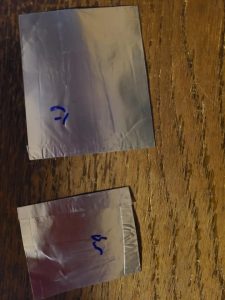
Flip it over and label it immediately to avoid confusion later on. While this method may not be the most time and space-efficient for spore prints. You will obtain a superior product made with care and mindfulness. You will avoid sanitation when possible in favor of taking more sterile steps. This more exacting and careful aseptic technique will be appreciated by all who receive your prints.
Things to be aware of to make a proper print:
- Foil comes sterile off the roll.
- You can sterilize foil in the oven if you compromise them or want to cut foil to size first.
- Chemicals sanitize. Do not wipe foil with alcohol or bleach to try to sterilize it. It won’t be sterilized. It will only be sanitized, we want the sterile foil to print on.
- Don’t print more than one row of caps at a time. To do multiple rows you’ll want to tent one row as you go.
- Don’t put your non-sterile hands over anything you want to keep aseptic.
- Even with a flow hood, you don’t want to hover your hands over the tops of other prints you have taken.
- If you’re printing with a flow hood don’t put sanitized instruments or surfaces in between the flow and your prints. You’ll want your prints to be closest to the flow so that nothing can blow onto them from the surface that has only been sanitized.
Article copied from the Shroomery